Firstly, let's come up with a list of features that we want for our movement state component. The following is the list that I came up with:
- Character has the ability to move in all directions.
- Character has the ability to sprint.
- Character has the ability to jump.
- Character has the ability to crouch.
- Character cannot sprint while crouching and vice-versa.
- Jumping will cancel sprinting or crouching.
- Cannot sprint, crouch or jump during a jump.
- The character will have a limited amount of energy to be used on sprinting and other activities.
- Energy will be regenerated fastest when the character is idle, 3/4 as fast when moving and not at all when sprinting or jumping.
- Sprinting will increase movement speed.
- Crouching will decrease movement speed.
Figure 1: Use Case Diagram for CharacterMovementState Component

For each use case, I create a simple use case specification. I include elements such as the use case name, the participating actors, flow of events, entry condition, exit conditions and quality requirements. Here is the use case specification I came up with for the Move use case:
|
Use Case Name
|
Move
|
|
Participating Actors
|
Initiated by CharacterController
|
|
Flow of Events
|
1.
The CharacterController activates the “Move” function during a
game session.
2.
The system sets the character state to “Moving” and
change attributes accordingly.
|
|
Entry Condition
|
· CharacterController currently in a game session.
|
|
Exit Conditions
|
·
The use case successfully completes a flow of
events.
|
|
Quality Requirements
|
·
System must respond within 0.02 seconds.
|
Here are the other use cases:
|
Use Case Name
|
Sprint
|
|
Participating Actors
|
Initiated by
|
|
Flow of Events
|
1.
The CharacterController activates the “Sprint” function during a
game session.
2.
The system checks to see if the “Sprint” function is
available at that time. It does this by checking if the character is not
jumping and has sufficient energy.
a.
If it is available, change the character’s state to “Sprinting”
and change attributes accordingly.
b.
If it is not available, do nothing and exit use case.
|
|
Entry Condition
|
· CharacterController currently in a game session.
|
|
Exit Conditions
|
·
The use case successfully completes a flow of
events.
|
|
Quality Requirements
|
·
System must respond within 0.02 seconds.
|
|
Use Case Name
|
Jump
|
|
Participating Actors
|
Initiated by
|
|
Flow of Events
|
1.
The CharacterController activates the “Jump” function during a
game session.
2.
The system checks to see if the “Jump” function is
available at that time. It does this by checking if the character is already
not jumping.
a.
If it is available, change the character’s state to “Jumping”
and change attributes accordingly.
b.
If it is not available, do nothing and exit use case.
|
|
Entry Condition
|
· CharacterController currently in a game session.
|
|
Exit Conditions
|
·
The use case successfully completes a flow of
events.
|
|
Quality Requirements
|
·
System must respond within 0.02 seconds.
|
|
Use Case Name
|
Crouch
|
|
Participating Actors
|
Initiated by
|
|
Flow of Events
|
1.
The CharacterController activates the “Crouch” function during a
game session.
2.
The system checks to see if the “Crouch” function is
available at that time. It does this by checking if the character is not
jumping.
a.
If it is available, the system checks to see if the
character is already crouching.
i.
If the character’s state is already “Crouching”,
change state to “Standing” and change attributes accordingly.
ii.
If the character’s state is “Standing”, change state
to “Crouching” and change attributes accordingly.
b.
If it is not available, do nothing and exit use case.
|
|
Entry Condition
|
· CharacterController currently in a game session.
|
|
Exit Conditions
|
·
The use case successfully completes a flow of
events.
|
|
Quality Requirements
|
·
System must respond within 0.02 seconds.
|
Now that we have the basic functionality of the system listed out, it's time to analyze these use cases and create a design to show how we will meet the features that we listed out earlier. At this point, you can go in a number of different directions; I'll start off by creating a start chart that models the movement state of a character.
Looking at the Move use case, I came up with this simple state chart:
Figure 2: State Chart for "Move" Use Case
The character starts off in the "Idle" state. With a Move() message, the object will go from "Idle" state to "Moving" state. All messages that are not listed, for example Stop() message while in "Idle" state, will be ignored. Looking at the Sprint use case, I added to the previous state chart and came up with this:
Figure 3: State Chart for "Move" and "Sprint" Use Cases

Looking at the Jump use case, I came up with this simple state chart:
Figure 4: State Chart for "Jump"Use Case
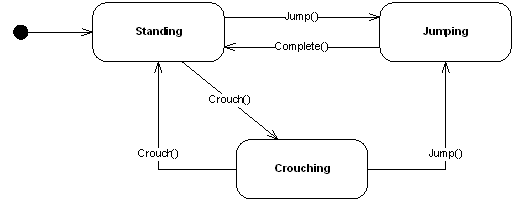
Complete() will happen when the character is finished jumping. Looking at the Crouch use case, I added to the previous state chart:
Figure 5: State Chart for "Jump" and "Crouch" Use Cases
We have two separate state charts now; to make things simpler later on, let's combine these state charts into one. First, let's look at what possible states we can have when combining them.
- When standing, the character can be Idle, Moving and Sprinting
- When Crouching, the character can be Idle and Moving. (Remember we said that we can't sprint and crouch at the same time)
- When Jumping, the character is just moving.
- Standing, Idle
- Standing, Moving
- Standing, Sprinting
- Crouching, Idle
- Crouching, Moving
- Jumping
Figure 6: State Chart for Overall Character Movement

This is the perfect situation for the State Design Pattern. Applying the principles of the State Design Pattern results in the following class diagram for our state chart:
Figure 7: Movement State Structure using State Pattern

Where MovementState, is an interface with methods similar to that of the messages in the state chart above. (Move(), Crouch(), Jump(), ...etc.) Each state is represented by a class that implements the MovementState interface. Now that we have a design for the movement state of our character, we need to look at what else we need. We need an Attributes class to hold all of our character's information such as energy, speed and such. It would also be a good idea to protect and shield the movement state and other parts of this component from other systems/components. To accomplish this, we use the Facade pattern.The resulting structure looks something like this:
Figure 8: CharacterState Component Structure using Facade Pattern

Other components will access this component through the interface ICharacterState. The beauty of this design is that now the CharacterState class can have a number of different states at once. If you want to add another type of state, simply repeat the process used above to create the movement state structure above. In general, the structure for an ObjectState Component could look something like this:
Figure 9: General Object State Pattern

Keep in mind that the three ConcreteState1 classes in the diagram are all different. (A better name would have been StateType1ConcreteState1, StateType2ConcreteState1 and so on, but you get the idea) This pattern is good to represent the state of any object.
Now that we have the general structure of our component done. Let's start to add the necessary methods and fields to every class and interface in our design. I'll start off with the Attributes class. Reading through the requirements above, I came up with the following fields for our Attributes class:
- Maximum Energy. (The energy value when the character is at 100% Energy. Type: Float)
- Walking Speed. (The movement speed of the character when they are walking. Type: Float)
- Sprinting Speed. (The movement speed of the character when they are sprinting. Type: Float)
- Crouching Speed. (The movement speed of the character when they are crouching. Type: Float)
- Current Speed. (The current movement speed of the character. Type: Float)
- Sprint Cost. (The amount of energy it costs to sprint per second. Type: Float)
- Energy Regeneration Rate. (The amount of energy regenerated per second when Idle. Type: Float)
- Current Energy. (The current amount of energy the character has. Type: Float)
- Fatigued? (Is the character currently fatigued? Type: Boolean)
- Fatigue Threshold(After reaching 0 energy, when regenerating energy, at what point the character is no longer fatigued. Type: Float)
Figure 10: Attributes Class with Updated Fields and Methods

Now let's work on our MovementState interface and the state classes that implement it. This is simple to do; all we have to do is add the messages of our state chart to the MovementState interface. Each method will have to pass the CharacterState class. (You will see why later on) The State Pattern requires no fields in its implementation, which is one of the many beautiful things about it. Here is the result in the class diagram:
Figure 11: MovementState Interface with Updated Fields and Methods

All the methods in MovementState are the same as those in the state chart we created. The only new method is the "State" method, which will simply return the name of the current state. We'll continue and move onto the CharacterState class and the ICharacterState interface. For the interface, we will need to allow access to all the methods to change the state. These are:
- Move
- Stop
- Crouch
- Jump
- Sprint
- Stop Sprinting
- Done Jumping
- Update
Figure 12: ICharacterState Interface with CharacterState Class Updated Methods and Fields

Here is our finished product:
Figure 13: CharacterState Component Class Diagram

Now that our design is essentially complete, it is time to implement this solution. Here is the link to my gitHub repository with my implementation. If you have questions about the implementation or you want me to show the implementation in detail let me know. If you have your own implementation and design leave it in the comments below. Also, you know of any ways to improve this design, don't be afraid to leave a comment below; I know it is not perfect.
No comments:
Post a Comment